Saturday Stitch: Waffle Ribs

Every Saturday I will share with you a new stitch.
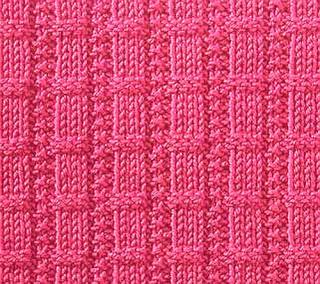
Today’s stitch is: Waffle Ribs


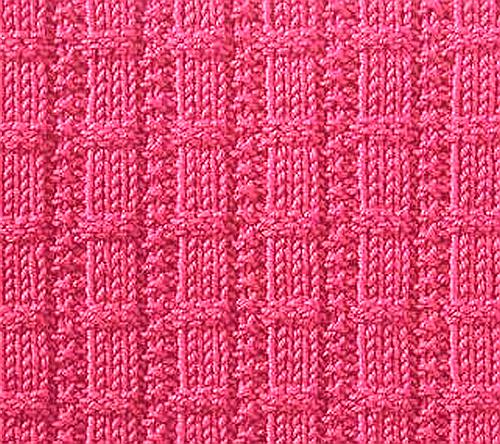
Easy knitting stitch with ribs consisting of small stockinette and reverse stockinette sections. Ribs are separated by single seed stitch chains. Great on a scarf, cowl or sweater.
You need a stitch number multiple of 6 + 7 + 2 edge stitches. Repeat the pattern between the * as many times as you like.

Instructions:

Row 1, 3, 5: edge st, k2, * p1, k1, p1, k3; repeat from * to last 6 sts, p1, k1, p1, k2, edge st
Row 2, 4, 6: edge st, p2, k3, * p3, k3; repeat from * to last 3 sts, p2, edge st
Row 7: edge st, p2, * p1, k1, p4; repeat from * to last 6 sts, p1, k1, p3, edge st
Row 8: edge st, knit across to last st, edge st

Repeat rows 1 through 8.


Difficulty level: Easy

Daily Knitting Deals at Craftsy.com

Saturday Stitch: Raised Ribs


Every Saturday I will share with you a new stitch.
Today’s stitch is: Raised Ribs


An easy knitting stitch with narrow raised stockinette ribs and garter stitch borders. Makes a nice decorative rib for a sweater.
You need a stitch number multiple of 6 + 7 + 2 edge stitches. Repeat the pattern between the * as many times as you like.

Instructions:

Row 1: edge st, k3, * p1, k5; repeat from * to last 5 sts, p1, k3, edge st
Row 2: edge st, p2, k2, * k1, p3, k2; repeat from * to last 4 sts, k1, p2, edge st
Repeat rows 1 through 2.

Difficulty level: Easy

Basket Weave Moss Stitch


Every Saturday I will share with you a new stitch.
Today’s stitch is: Basket Weave Moss Stitch.


A beautiful basket weave stitch with a seed stitch twist. In this case seed stitch elements are added to the traditional basket weave stitch of stockinette and reverse stockinette. Ideal for throws and blankets either overall or border.
You need a stitch number multiple of 14 + 1 + 2 edge stitches. Repeat the pattern between the * as many times as you like.

Instructions

Rows 1, 3 & 5: edge st, * k5, p5, (k1, p1) x 2; repeat from * to last 2 sts, k1, edge st
Rows 2, 4 & 6: edge st, k1, * p1, k1, p1, k6, p5; repeat from * to last st, edge st
Row 7: edge st, knit across to last st, edge st
Row 8: edge st, purl across to last st, edge st
Rows 9, 11 & 13: edge st, * p5, (k1, p1) x 2, k5; repeat from * to last 2 sts, k1, edge st
Rows 10, 12 & 14: edge st, p1, * p4, (k1, p1) x 2, k6; repeat from * to last st, edge st
Row 15: edge st, knit across to last st, edge st
Row 16: edge st, purl across to last st, edge st
Rows 17, 19 & 21: edge st, * (k1, p1) x 2, k6, p4; repeat from * to last 2 sts, p1, edge st
Rows 18, 20 & 22: edge st, k1, * k4, p5, (k1, p1) x 2, k1; repeat from * to last st, edge st
Row 23: edge st, knit across to last st, edge st
Row 24: edge st, purl across to last st, edge st

Repeat rows 1 through 24.
Difficulty level: Easy

Easy Knit Handbag

If you’re not careful it’s easy to become obsessed with knitting bags! Not that that’s a bad thing. This Easy Knit Handbag is the perfect project for beginners who are ready to try knitting more than just scarves. Knit with straight knitting needles, this pattern uses the stockinette stitch and garter stitch to create  texture. I love easy knitting patterns that are practical, stylish and fun to make! This free knit bag pattern is really cute you’ll want to make it right away.


Materials:
100grm  Ribbon type yarn
100grm Double knitting type yarn
Size 4mm needles or size to obtain gauge
Two Handles
1 piece of cardboard 4inches wide x 10inches long for bottom of bag.


Gauge – Two yarns knit together
26sts=4”;24rows=4”inPatSt
TOSAVETIME,TAKETIMETOCHECKGAUGE


Note
The base of the bag is double thickness with cardboard in between.


Bag Front


With 4mm needles and both yarns together cast on 24 stitches and work 10 rows Stockinette stitch ( rightside row knit, wrongside row purl).


Next cast on 10 sts at begining of next two rows  -44sts


Pattern
Work 8 rows garter stitch ( every row knit)
Next work 10 rows Stockinette stitch
 Repeat these 18 rows three times then a further 8 rows garter stitch.
Cast off.


Bag Back
Work same as the front.
Base/Side Strip
Cast on 30 sts and work in garter st for 24 inches. 
Cast off.

In the same maner make a second strip 10 inches long.


FINISHING
Laythe 10 inche stripontopofthe 24 inch stripcenteringtheshorterstrip.Sewbothlongedgesleavingthenarrow edgesopen,thisformsapocketoneachsideandadoublebase. Insertcardboardbetweenthe2stripsbefore completingthesecondedgeandtackstripstogatbottomofpocketstoholdcardboardinplace.Sewonelong edgetothefrontandonelongedgetothebacksections.
Place one handle at the cast on edge of thr front of bag, Fold cast on edge over to secure handle and sew in place. Repeat for bag back. Line if desired.


The secret of the knitted bag is choosing the correct yarn then adding your own little twist. Have a go and let your creative juices flow!